

There comes a point in every young professional’s life when you realize: Hey. I work hard and earn good money. I can afford a nice car, right?
So you crunch some numbers and realize: Holy moly! I can afford a nice car!
But then you remember that the monthly payment is just the beginning. There’s also insurance, oil changes, parking passes, tires, windshield wipers, and more to consider when budgeting for a car purchase.
That’s not to say you can’t afford a nice car — we just want to eliminate any surprises and ensure you stay on budget while driving your new whip into the sunset.
So what are the seven true total costs of car ownership? How much should you budget for each? And if they push the car you want out of budget, what are my top tips for saving up to 40%?
Let’s dive into the seven true costs of car ownership (and how to shrink them down).
TL;DR: Owning a car costs around $940 a month
All things considered, having a car in your life will cost around $940 a month all-in.
AAA’s estimate was $894 for 2022, but my estimate is a little higher because folks under 30 have higher insurance premiums. AAA also didn’t include parking in their estimate, which I discuss below.
Anyways, before breaking down the seven true costs of owning a car, let’s talk about the very first one: the cost of the car itself.
How much does the average car cost?
In 2022, the average cost of new and used cars topped $47,000 and $33,000, respectively. High demand, low inventory, and inflation all played a role in prices creeping up, especially for new cars.
To learn precisely how much car you can safely afford, check out our Car Affordability Calculator. You’ll learn about the 35% rule, when leasing makes sense over buying used, and whether you should pay cash or finance.
But in the end, your monthly payment is just one small part of the true cost of ownership.
The 7 true costs of car ownership
1. Monthly financing or lease payments: ~$450/month
Naturally, your first big expense will be your monthly loan or lease payment.
Let’s say you purchase a used 2019 Toyota Camry for $25,000 with 20% down. Your credit score is a solid 690, so you score 5% APR for 36 months.
Taking a look at our handy Auto Loan Calculator, your monthly payment will come out to $485.53. It’s roughly the same payment if you lease a new one, which is why I strongly recommend financing a used car over leasing a new one. In the former case you’re building equity until you own the car outright, whereas with a lease you have to restart every few years.
You can always stretch your loan term from 36 to 48 months to lower your monthly payment to $373.07. But I don’t recommend going longer than 48 months since you’ll be paying way more in interest and risk going underwater (where you owe more than the car is worth).
But the key takeaway is this: your monthly payment typically represents ~50% of your true cost of ownership.
Let’s cover the other half.
2. Fuel/charging: ~$150/month
Your next cost of car ownership will be paying for gas (or electricity for your EV).
According to AAA, in Q4 2022 the average cost of gas nationwide has plummeted from nearly $5.00 to just $3.68. So if you drive a 30 MPG car 15,000 miles a year, you’ll want to budget $1,840 per year, or $153.33 per month for gas.
The volatile cost of fuel is the main reason why folks consider getting an EV, but even though recharging an EV is way cheaper, there are other costs to consider.
For instance, charging an EV at a public station like Bluedot costs around $0.10/mile or $1,500 per year to drive 15,000 miles. It’s only $0.03/mile ($450/year) if you charge at home, but if you want to get more than 15 miles of range per night, you’ll need to install a Level 2 charger for ~$2,000.
So unless you have access to a free Level 2 charger in your parking deck, the cost of fuel and charging come out to roughly the same these days.
3. Maintenance and repairs: ~$150/month to $600/month
Here’s where things can vary wildly depending on which make and model car you go with. Because while a 2019 Toyota Camry and a BMW 3 Series may both cost around $28k to buy used, one costs tens of thousands more to own.
First, there’s the difference between maintenance and repairs.
Maintenance is regular, routine stuff that every car needs to stay on the road. Things like:
- Oil changes
- Fluid top-offs
- Tire balancing and rotation
- Alignments
- Car washes (to preserve your paint)
- Filter replacements
Repairs, on the other hand, are unplanned fixes to parts that broke or went wrong. Things like:
- Leaky transmissions
- Falling suspension components
- Bad wiring and electronics
- Failed motors (window, sunroof, etc.)
- Brake failure
And more.
As a result, the cost difference between owning a reliable versus unreliable car can be staggering. To illustrate, my 2008 IS 350 has needed just $710 in repairs in the last 15 years. By contrast, Doug DeMuro’s 2006 Range Rover needed $15,659.51 in repairs within four years.
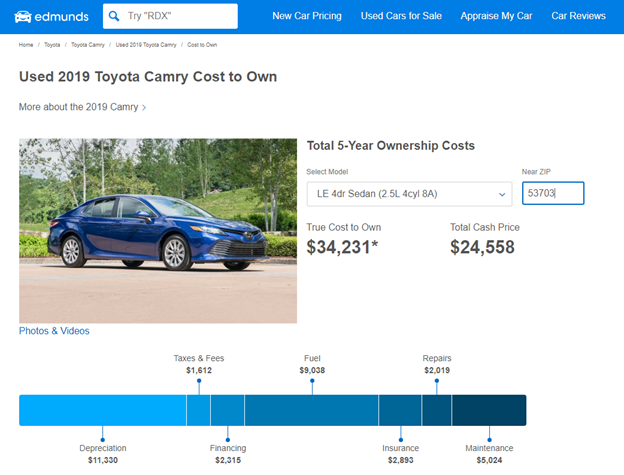
Leases naturally cost less in maintenance and repairs since the dealer will cover most of them, but if you buy a used car, definitely check the Edmunds True Cost to Own before you buy.
Using that tool, you can see how the cost of maintaining and repairing a Toyota Camry for five years is $7,043, whereas the cost to own an equivalent Bimmer is $20,419.

4. Insurance: ~$150/month
According to PolicyGenius, the national average for full coverage auto insurance is $1,662 annually or $138.20 per month. Since we’re young and young drivers pay more, we’ll call it $150 to be safe.
But what if you don’t want full coverage (liability + collision + comprehensive)?
Well, most lease/loan agreements require you to have full coverage until you own the car outright, since it’s technically someone else’s property.
Thankfully, even at the full coverage level, there are tons of ways to save up to 40% on your auto insurance.
5. Registration, taxes, and fees: ~$10/month (~$120/year)
Once you pay sales tax on your initial purchase, your annual taxes and fees can be pretty cheap depending on your state.
The National Conference of State Legislatures has a handy interactive map for quickly finding your state’s registration and title fees. In Georgia, for example, they’re just $20 and $18 respectively.
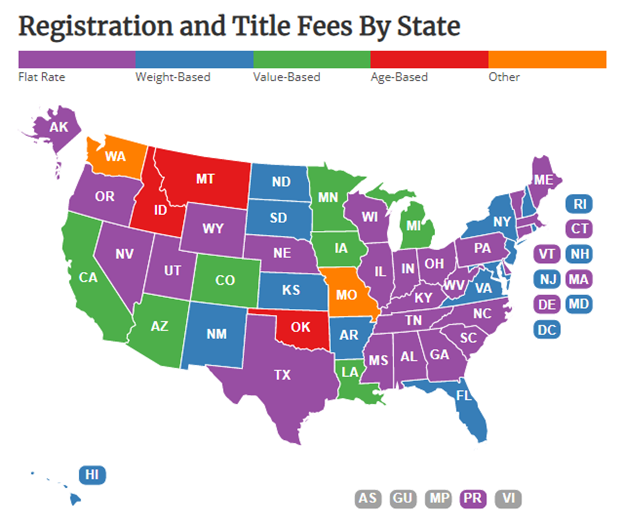
North Dakota has the highest annual registration fees at $274, but most states are under $100. So not a significant cost, but a cost nonetheless!
6. Parking: ~$0 to $350/month
Most lists like this don’t include parking as an expense (not even AAA does). But considering parking can cost more than insurance I think it’s definitely worth a (dis)honorable mention!
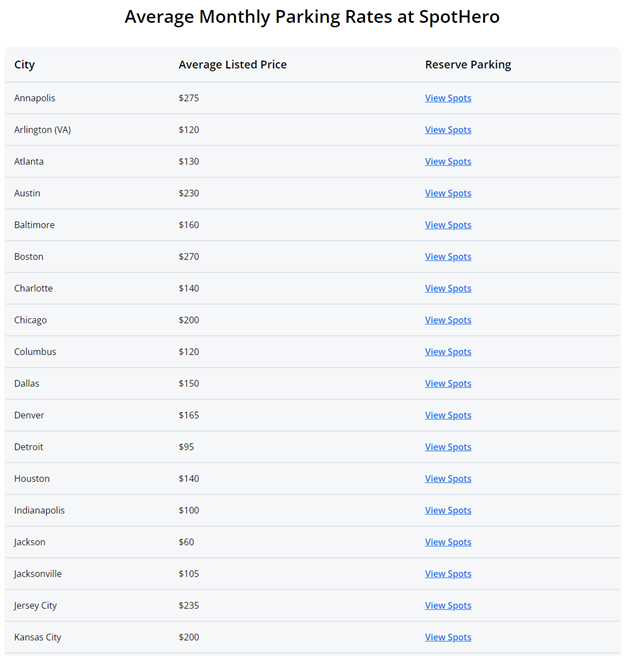
According to SpotHero, the monthly cost to park in U.S. cities tends to range from $50 in Mobile to $340 in San Francisco, with the average hovering around $150. You can see the full list here.
So in addition to checking the Edmunds True Cost to Own, you definitely want to estimate the “True Cost to Park” your new car. Does your landlord offer free parking? How about work? And how often will you be going into the city for an event with pricey parking ($30)?
7. Depreciation: ~$250/month
The final “cost” associated with owning a car is depreciation, aka your car’s sliding market value over time.
I put “cost” in quotes because depreciation isn’t a monthly, out-of-pocket expense. It only really shows up when you go to sell the car in 1, 3, or 10 years.
To use the Camry versus 3 Series example from above, you’ll see how a Camry depreciates very slowly. In five years, it’ll only lose $11,330 of its value; that means if you sell it in five years, you’ll only have paid $24,558 – $11,330 = $13,228 to own it during that time.
That’s $220.47/month, minus the interest you pay your lender plus other expenses.
BMWs, on the other hand, depreciate faster due to their mixed reputation for longevity. At the end of five years your 3 Series will only retain $15,046, or 47.4% of its value. That means once you sell it, you’ll have paid $251.27 per month to own it for five years (again, minus interest and other expenses).
Depreciation never applies to a lease since it’s never your car to sell, and EVs tend to depreciate even faster due to range deterioration, expiring battery warranties, and the uncomfortable reality that most EVs will need new batteries around 10 years in at a cost of $8,000 to $20,000.
The total costs of owning a car
Alright, let’s tally it up!
- Monthly loan/lease payment: ~$450/month
- Fuel/charging: ~$150/month
- Maintenance and repairs: ~$150/month
- Insurance: ~$150/month
- Registration, taxes, and fees: ~$10/month
- Parking: ~$30/month
- Depreciation: ~$250/month
- Total out-of-pocket costs (not including depreciation): $940/month
If that number was a little higher than you were hoping, how can we chisel it down?
How to save money on owning a car
As a car broker with years of experience, here are my top tips for saving money on all seven categories of car ownership:
- Monthly payment: Finance a reliable, 3+-year-old car. Choose a 36- or 48-month term with a lender, and be sure they charge no origination fees nor early repayment fees so as your income rises, can pay off your auto loan faster and save on interest.
- Fuel/charging: Get a Costco/Sam’s Club/BJ’s card and save ~$0.25/gallon. If you’re driving 25k+ miles/year, consider a gas rewards card. For EV charging, don’t expect to save on “fuel” unless you have access to free charging.
- Maintenance and repairs: Buy from a top-three reliable brand (Toyota/Lexus/Mazda). Skip the extended warranty and get pre-purchase inspection (PPI) within the car’s return window instead to ensure quality. For maintenance, teach yourself the easy stuff (wipers, filters, etc.) and find an experienced, trustworthy mechanic nearby for the big stuff. Skip the dealer and low quality national chains (Jiffy Lube, Firestone, etc.).
- Insurance: Read our car insurance guide to itemize exactly how much of what type of insurance you need, then get quotes from at least five of our picks for the Best Car Insurance Companies.
- Registration, taxes, and fees: Not much you can do on this front, besides buying your car in another state with lower sales tax and driving it home.
- Parking: Always have a plan for parking. Know where the free parking is, and check SpotHero and similar sites for great monthly rates.
- Depreciation: Most cars lose 40% of their value within the first three years. So buying used can save you $10,000+ in upfront costs and depreciation.
The bottom line
At ~$940 a month, cars aren’t cheap. But if they improve your quality of life through comfort, convenience, or the sheer joy of whipping around corners, they can absolutely be worth it.